Questions before buying a new gear

It is struggling for any photography addict to buying new gears (body, lens, filter...). This post will help you clarify your decision by answer the following questions:

1. Have you ever owned a camera?
If you haven't got one. Please consider this post.

2. How long have you been using your gears? How many photos have you taken?

After having your first camera and lenses. This is your next question to answer.. If the answer is less than 6 months and 1000 photos. Then the answer is you DO NOT need to buy any new gears. The more you use your camera to take photos, the better you know what you need, and more important (while reading this post) it will help you to answer the following questions.

3. What is your favourite target and time?
What is your favourite?


Let's have a look at your photo gallery/ portfolio and answer this question. It can be landscape, portrait, street, wildlife...

Lenses for The Discerning Landscape Photographer

Photography is about capturing light though lenses, but choosing the right lens for the job isn’t always cut and dry.  Lenses for landscape photographers can be particularly difficult to choose because the vast array of options available.

First and foremost, there is no one-size fits all, do everything lens.  New photographers often look for the one lens that will do everything and then some, this doesn’t exist.  There are options to fit your specific needs though, and that’s what we’re going to explore.  The real answer is 12mm-500mm, it really depends on what you’re shooting and where you are in relation to it. If you can find one lens like that, the quality of images it produces will be the next issue. Remember, the longer lens' range is, the worse its optical quality.

Fast lenses, or those with a maximum aperture of f/2.8 or faster aren’t always needed either, because the sweet spot of most lenses, or where they are sharpest and perform the best, is often between f/8 and f/11

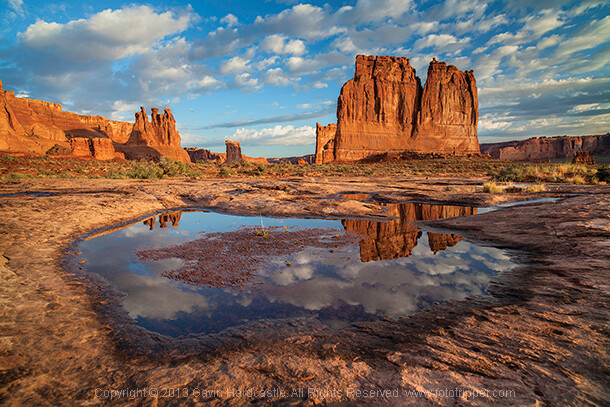
The wide angle lens is traditionally the go-to lens for landscape photographers.  On full frame digital SLR’s this would be anything from about 14mm through 35mm, depending on the manufacture.  For cropped sensor digital SLRs, specific wide angle lenses, like the Sigma 12-24mm zoom give the equivalent of an 18-36mm lens, still allowing a very wide shot.  The wide angle id desirable because it allows for a larger then life perspective on your landscape, capturing what’s immediately in front of you, at your feet all the way through the edge of one’s peripheral vision.  It’s the go-to lens for many landscape photographers
Sigma 12-24mm, one of the equivalent lens for landscape photography

Normanby - France: Stunning sky

This is a photo of Kris Kombe taken in Normanby, France. It's a stunning example of taking portrait landscape.

Rule of thirds - Definition and examples

You can find easily what rule of thirds is by google it. And there are heaps of webpage talking about it, one of them is wiki page because it is, probably, the most well known principle of photographic composition.
But in this post, I want to talk briefly about definition of the rule and giving some examples.

Rule of Thirds Definition

In the rule of thirds, photos are divided into thirds with two imaginary lines vertically and two lines horizontally making three columns, three rows, and nine sections in the images. Important compositional elements and leading lines are placed on or near the imaginary lines and where the lines intersect.
Grids make you easier to compose your image (Source: Wiki)

How long will the shutter last?

After identifying your shutter count. The next question should be: is it too many or is it worth to buy a second hand camera with 40 000 shutter count?


I will help you to answer such questions with easy step. Please look at the following diagram.

This diagram shows the average survival percentage of a DSLR camera based on the shutter count.

How can you read these information?

Understanding the dept of field (DOF)


Definition: Depth Of Field (DOF) is the distance between the nearest and farthest objects in a scene that appear acceptably sharp in an image.
The above illutration using the same focal length (of focus distance) and different aperture (ie. 2.8, 5.6 and 22)
To practice this effect,

13 ways to become a well-known photographer

This story is posted on Digital camera magazine from Richard Dunwoody
He shared his 13 tips to raise his profile as a horse photographer after giving up riding race-horses.

What do you think about his sharing? What is your opinion. Please comment and share!


1. Be passionate

When you’re starting out, you’ll naturally be more comfortable shooting something you know well – for me that was horses. A passion for your subject will shine through in your images.

Bonus tips:
Have your got your camera available?
Do you want a DSLR camera?
Please read this post to find out what is suitable for you to start your career.
If you do not have enough money, a second hand camera with a good shutter count can help.


Things the photography guide books don’t tell you about composition (part 2)

(Continue)
5. Wait for the traffic

If there’s a road in the scene you are composing watch out for traffic and (in most cases) time the shot to avoid having any traffic in it.

If the road is quite nearby it’s often possible to conceal it by shooting from a slightly lower angle than normal.

If you’re photographing an area with busy traffic consider taking a sequence of shots with the camera rock-steady on a tripod. Shoot until you have at least one shot of every area in the scene without any traffic. You can then create a composite image without any cars.


6. Get rid of tourists


Things the photography guide books don’t tell you about composition

Photography guide books like to talk about the rule of thirds, leading lines and the golden triangle, but there are a few other tips and tricks to composition that they don’t tend to mention that are only picked up after a bit of experience with a camera. We’re here to help you fast-track

1. Add foreground interest

Most guide books will tell you that you should include some foreground interest in your images to draw the viewer’s eye into the shot and give a heightened sense of scale and depth. With a still life shot you create the whole scene, including something in the foreground, and there’s no reason why you can’t occasionally do this with a landscape shot as well.

A few brightly coloured leaves scattered in the foreground of an autumn landscape, for example, can really work well and a few carefully made footprints or a strategically placed shell or stone can enhance a beach scene.


2. Get in the shot

How to Get Amazing Landscape Images

The most common question I get asked by my workshop students is ‘how do you get such sharp images?’. It’s actually really simple. Basically, avoid movement of any kind while the shutter is open, focus well and choose the right aperture for your creative vision. Mostly it’s just plain old common sense with a couple of technical elements thrown in, so if you want to learn how to get super sharp landscape photography images, here’s my list of top tips.

Top tips for sharper landscape photography

How to take sharp landscape images - Gavin Hardcastle

1 – Use a good tripod with a sturdy ball head and make sure everything is TIGHT

Seems obvious, but time and time again I see students using decent tripods and they often don’t have everything clamped down tightly. For example, the attachment that is screwed to the underside of your camera should be as tight as you can get it, eventually it’ll work its way loose. Make sure that ball head is completely locked down once you’ve composed your shot.

2 – While taking the shot, don’t place your hands on your tripod


Mom is Number One


So interesting and meaningful story!

Thanks, I love you Mom!

24 hours a day

7 days a week

365 days a year without sleep, lunch an not any wages!


Amazing windmill

Windmill
Photo by: DML photography
Source: FB
nature, photosaddict, windmill

This is another example for the tips before. Why should you take a vertical aspect landscape and

How to take a vertical aspect landscape?

In the previous post, I showed you why you should take a vertical aspect landscape. And now is some tips to take a vertical aspect landscape.

Vertical Shooting Tip 1: Get Low and Close

As I noted in the previous image, getting low and close accentuates the visual power of leading lines and dramatically increases the visual weight of foreground features. To go low you will need to use a tripod that has no centre column in order to get super close to the ground, I have detailed our tripod advice here which may be of interest if you are perplexed by the ins and outs of the tripod purchasing process.
Mount Egmont New Zealand. Canon 5d mkii, Canon 17-40mm f/4 ultra-wide, Marumi polarizer. 17 mm, f/16, 1 sec, ISO100. By getting implausibly close to the foreground grass in this scene I have eliminated other distracting elements, increased the visual weight of the grasses and accentuated the leading lines in the bottom right of shot. As well as being close, I was also very low to the ground while making this image.

Reasons to Shoot Vertical Aspect Landscapes

The majority of landscape images are photographed in the horizontal aspect. I guess this because the horizontal format approximates the way in which we perceive ‘reality.’ However landscapes look stunning in the vertical format and often the unique characteristics of the upright format suit a scene better than a horizontal* composition. I am guilty of undershooting verticals these days, primarily for commercial reasons, but in any given shooting situation I try to remind myself to seek both a vertical and a horizontal composition from a scene.
Here’s why I think you should photograph vertically and some quick tips for successful upright image making.

Reason One: Verticals are Easy to Learn

Vertical composition using a wide angle or ultra-wide lens is the fast track to making interesting landscape images. My first successful landscapes were all vertical compositions where I found a moderately photogenic foreground object and used this to lead into the greater scene. To this day I find it easier to frame up an interesting sunset in the vertical format. I use rocks, grasses, flowers – just about anything with form to introduce the viewer’s eye to the scene.
Moraine Lake, Alberta Canada (1997).  Nikon F601, Nikkor 24mm, f/16, (shutter speed unknown), Fuji Velvia and most importantly, Lee 3 stop GND filter.  This was the first image that I ever made that actually turned out how I thought it would!  Note that foreground elements don't have to be spectacular to work, they just have to be well arranged in the frame and complement the rest of the scene.  When I was learning, I found it easier to eliminate foreground distractions and make a 'tight' composition in the vertical format. As a result, I shot far too many verticals in my early days and very few good horizontal images...
Moraine Lake, Alberta Canada (1997). Nikon F601, Nikkor 24mm, f/16, (shutter speed unknown), Fuji Velvia and most importantly, Lee 3 stop GND filter. This was the first image that I ever made that actually turned out how I thought it would! Note that foreground elements don’t have to be spectacular to work, they just have to be well arranged in the frame and complement the rest of the scene. When I was learning, I found it easier to eliminate foreground distractions and make a ‘tight’ composition in the vertical format. As a result, I shot far too many verticals in my early days and very few good horizontal images…

My weekend landscapes

These are four photos of my favorite landscape shots. Let's have a look and enjoy!


Sunset on Brighton beach.

Relaxing and de-stress with my family to Brighton beach yesterday, 15 April 2014.
It's a bit late because of the traffic jam but still a bit lucky for a few memorial shots.
Critical comments are welcome!


How to Take Amazing Portraits

1. Alter Your Perspective - Change your camera angle
2. Play with Eye Contact - Try different way your model look at or off the camera. Or if you have more than 1 model, ask them to look at each other.
3. Break the Rules of Composition: Forget the "Rule of third" and try to put your model at the edge and give her/him some target to look at.

Creative Ways to Find New Locations to Photograph

#1 – Stuck on Earth application on iPhone

#2 – Join a Photo Club

#3 – Make an Old Place New By Going At Night

#4 – Buy a Guide Book to Your Local State

#5 – Fill up your tank and just drive

photosaddict, Lam Hoang, night, tips, creative photography

How to Reduce Camera Shake

1st help: Use VR (Vibration Reduction - for Nikon) or IS (Image Stabilization - for Canon) (and heaps of different terminologies for it: OS, MegaOIS, SR, IBIS...)


2nd help: Tripod

 And if you do not have a tripod, try one of the following poses:

Learning about Exposure – The Exposure Triangle

The three elements are:

  1. ISO – the measure of a digital camera sensor’s sensitivity to light
  2. Aperture – the size of the opening in the lens when a picture is taken
  3. Shutter Speed – the amount of time that the shutter is open
It is at the intersection of these three elements that an image’s exposure is worked out.
Most importantly – a change in one of the elements will impact the others. This means that you can never really isolate just one of the elements alone but always need to have the others in the back of your mind.

3 Metaphors for understanding the digital photography exposure triangle:

Many people describe the relationship between ISO, Aperture and Shutter Speed using different metaphors to help us get our heads around it. Let me share three. A quick word of warning first though – like most metaphors – these are far from perfect and are just for illustrative purposes:
Shutters
The Window
Imagine your camera is like a window with shutters that open and close.
Aperture is the size of the window. If it’s bigger more light gets through and the room is brighter.
Shutter Speed is the amount of time that the shutters of the window are open. The longer you leave them open the more that comes in.
Now imagine that you’re inside the room and are wearing sunglasses (hopefully this isn’t too much of a stretch). Your eyes become desensitized to the light that comes in (it’s like a low ISO).
There are a number of ways of increasing the amount of light in the room (or at least how much it seems that there is. You could increase the time that the shutters are open (decrease shutter speed), you could increase the size of the window (increase aperture) or you could take off your sunglasses (make the ISO larger).
Ok – it’s not the perfect illustration – but you get the idea.

Hong Kong Symphony of Light

Hong Kong Symphony of Light
A picture reminds me of Hong Kong. I have been to Hong Kong twice and definitely went to Victoria Harbour to see the Symphony of Light.
The show has 5 distinct musical sequences. The first, ‘Awakening’ followed by ‘Energy’, which signifies the dynamism of the city and is represented by a display of rising colour patterns across the buildings and the deployment of lasers and searchlights against the sky; thereafter follows ‘Heritage’, which sees the light display turn to the traditionally lucky colours of red and gold as a soundtrack of Chinese musical instruments plays on. For the penultimate sequence ‘Partnership’, powerful beams stretch across both sides of the harbour to connect at its centre; the finale ‘Celebration’ sees technicians go all out to provide a rousing culmination – the light display is intensified and the soundtrack booms.

How to make a photo gallery without 3rd party code/widget

Today, I want to show you how to make a photo gallery from your uploaded photos on your Blogspot or Picasa (Google service).
This post explains how create a photo gallery on Blogger containing 6 images arranged in a 2 row by 3 column table.
Firstly, you need to create a new post in HTML mode.
Secondly, copy and paste the following code in to HTML editing window
<table cellpadding="3"> <!--3 means 3 columns-->
<tbody>

<!--Each block is a row. If you want more row, copy and paste the following block-->
<tr>
<td align="center" width="25%"></td>
</tr>
<tr>
<td align="center" width="25%"></td>
</tr>
</tbody>
</table>
Then, put the insertion point before the closing tag (</tg> and click Insert image icon, choose image source as "From this blog" or "From Picasa web album". Choose an image to insert.
Repeat this step for other 5 photos to have a gallery of 6 (2 by 3).
flower, gallery, raindrop, photosaddict
Example for photo gallery

Finally,

Sample for photo gallery (no 3rd party code)

This is an example for a very simple way to make a photo gallery with your uploaded images in your Blogspot or Picasa.
flower, raindrop, photo addict, photosaddict
Flower 1
flower, raindrop, photo addict, photosaddict
Flower 2
flower, raindrop, photo addict, photosaddict
Flower 3
flower, raindrop, photo addict, photosaddict
Flower 4
flower, raindrop, photo addict, photosaddict
Flower 5
flower, raindrop, photo addict, photosaddict
Raindrop

How to create a photo gallery in Blogspot

If you have many photos in your Blogspot and you want to make a gallery for it every month or every week or even for one event and so on.
This instruction will show you how to create a photo gallery and publish it on your Blogspot.
Step 1: Go to http://www.quickgallery.com/. You need your email to get the code and the password for the first time using this website.

Step 2: Follow 3 steps on http://www.quickgallery.com/ to create your gallery.
If you use Flickr (like me), you can choose your Flickr ID, photo set ID or tags to make up your gallery.
After the 3rd step, you will have a box of code (if you're a registered user) or you will be asked to provide an email address to get the code and the password as well if this is the first use.